Hybrid Transitions: Collaborative Itajime by Tyler Peterson
February 22, 2017
In continuation with the previous article on katazome and technology, textile artist Tyler Peterson presents a new exploration into traditional historic dye processes with a technological update in collaboration with Aaron De Lanty.
The idea for this experiment came from a conversation Aaron and I had over a year ago about ways to speed up and make a very involved dye process more accessible—the main subject of that discussion being kyokechi itajime.
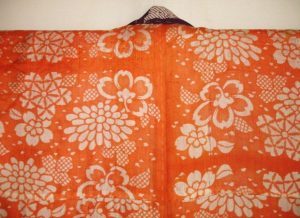
Historical examples of kyokechi itajime using beni or safflower dye
Historical examples of kyokechi itajime using beni or safflower dye
The historical process of itajime started in China, and made its way to Japan around the 8th century, where the process reached new and impressive heights. But what is itajime? Many know of itajime shibori—a surface design technique using wooden blocks and clamps to create patterns on cloth by physically resisting the dye. Kyokechi itajime is a more advanced form of the shaped resist process. It features two flat mirrored image boards with folded fabric sandwiched in-between, and then clamped under great pressure. The raised parts of the image hold the fabric between the boards, as well as resist the fabric from being dyed. In Japan one of the dyes most favored for use with this process is benibana or safflower, giving rise to another name for the process; beni itajime.
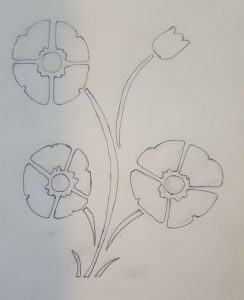
Traced original drawing
One of the most time consuming aspects is carving the wooden boards, and neither of us are skilled carvers. Instead, we set out to see if we could get similar results using 3D printing. Aaron began by sketching a design on paper with crisp, clean, and carefully traced lines which will become the risen part of the block.
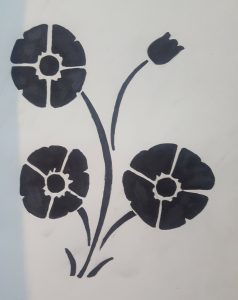
Drawing filled in with marker, ready to be scanned
Using a free app called CamScanner, Aaron scanned the drawing and converted it into a PDF—allowing it to be opened up in Adobe Illustrator. After editing the image he exported it out as an SVG file (Scalable Vector Graphics). From there Aaron imported the file into a CAD capable software (Rhino or TinkerCAD). Don’t know how to use CAD? Neither did I but Aaron showed me what TinkerCAD is and I found it to be extremely user-friendly with a multitude of tutorials on how to use it, plus it’s free!
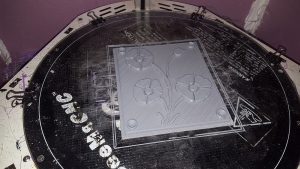
Block on the 3D printer bed
While in the CAD software, Aaron extruded the design by taking the flat image and raising it to two different levels (a three millimeter base, and a three millimeter floral design). The reasoning for having the dimensions that scale is to allow the dye to flow better, and maximize the cost efficiency when getting the block printed.
Now if you are like me and don’t have a 3D printer, or don’t have a friend like Aaron who has one, there are several resources out there to connect people who need things printed with people who have a 3D printer. 3DHubs is a great resource that connects you with local 3D printer owners to get you access to a nearby printer. There are also fabrication labs, maker spaces, universities and design firms that are starting to have 3D printers, making this technology a lot more accessible to the general public.
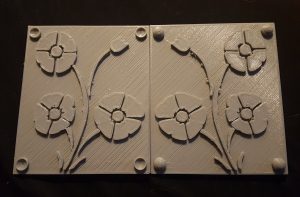
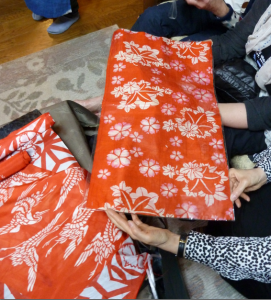
Finished printed blocks!
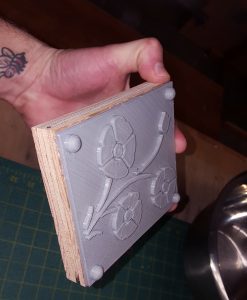
Wooden backing that has been glued to the printed block
After the images were 3D printed, we glued them to a backerboard of the same dimensions. From there we sanded the block to make sure the edges are flush and smooth. Then it was on to the dyeing!
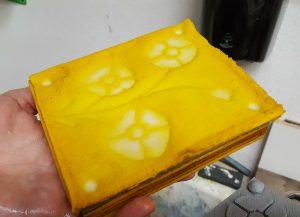
Our first samples were created using a piece of raw silk noil for the fabric and a dye bath of gardenia fruits. Gardenia is a natural dye that has been used in Japan and East Asia for centuries for both dye and medicinal purposes. It provides a super bright, strong, and lovely yellow color with no need for a mordant—a perfect dye to use in making a sample.

Pouring the dye
The blocks are opened
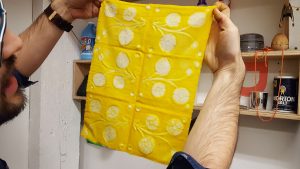
In the same manner as traditional dyers, we clamped the fabric between our two boards with mirrored 3D printer images and began pouring the bright yellow dye over the entire assemblage. Gardenia dye works quickly so we only poured the dye on for a few minutes, and then unclamped our first sample. We continued on with more samples and new cloths. The end results were pleasantly surprising! For the first time attempting this process using 3D printing, we got some lovely results.
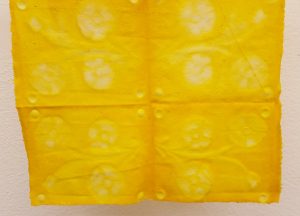
First sample
Second sample
There were a few things we learned and are making adjustments for our next attempt….
- Hot water can melt plastic…duh! The type of plastic we used was PLA which we had originally chose for its strength and durability. There are other plastics like PETG which have a much higher melting point that would withstand having boiling water poured over them.
- The kind of clamps matter. Our first attempt used plastic C clamps which worked alright, but didn’t provide enough pressure. Our second sample had large metal C clamps that worked much better and allowed us to apply a lot more pressure to the blocks.
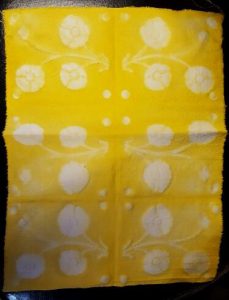
Second sample fully dried
In the end it was a pretty satisfying experiment. We are convinced that through refinement and problem solving 3D printed kyokechi blocks can be successfully made. With some software know how and access to a 3D printer it can be really easy to recreate this ancient process using your own designs and patterns.
Resources:
TinkerCAD: https://www.tinkercad.com/
3Dhubs: https://www.3dhubs.com/
Short article on historical kyokechi dyeing: A Rare Glimpse at Hand Carved Itajima Boards
Article about the historical process: Beni Itajimi: Carved Board Clamp Resist Dyeing in Red by Masanao Arai and Yoshiko Wada
Tyler Peterson is an artist and educator based in Portland, OR. He graduated with his MFA in Applied Craft + Design and was awarded the program’s 2015-2016 Fellowship position. He has shown work in Oregon, Colorado, and Tennessee and recently finished a residency with c3:initiative and Pulp & Deckle. Since 2014 he has been an instructor for WildCraft Studio School teaching classes on natural dyes and traditional Japanese textile processes.
Aaron De Lanty is a multidisciplinary artist who works in a multitude of ways. With interests in both open source ideology and obscuring the truth; he investigates identity and relationships through various forms of analog and digital communication. He is currently pursuing his MFA in Applied Craft + Design in Portland, OR. He is an internationally exhibiting artist with shows in London, Wisconsin, Oregon, and Georgia.

Related Blog Articles
Creative Process
“Fringe: On the Edge of Fiber” — Out Now!
Creative Process
Friday Fibers Roundup: Craft & Color
Creative Process
“Standing Tall: A Heart-FELT Reflection” by Martien van Zuilen