Photographing Your Work by Jason Houge
November 17, 2016
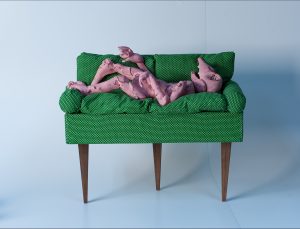
Submissions are now open for Shifting Landscapes (SDA’s 3rd International Juried Members’ exhibition), and we thought it would be helpful to provide an in-depth tutorial for how to properly photograph artwork. Having good images of your work to submit can make or break your chances of getting into any juried exhibition. We are so very lucky to have photographer, Jason Houge show us how he documents artists’ work, as well as some tips and tricks to go from this:
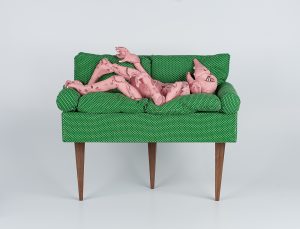
To this:
Equipment:
To start documenting your work properly, you will need some basic equipment.
– Camera that saves RAW files paired with a “normal” lens
– 2 Lights of the same kind
– 2 soft boxes, or scrims to soften the light as needed
– Grey card
– Sturdy Tripod
– A darkened space to work in.
– A wall to hang on and/or some white backdrop material
– A computer running a version of Adobe Photoshop compatible with your camera’s file type.
A few important notes about equipment:
The camera and lens may seem to be the most obvious equipment you’ll need. However, this equipment is often some of the least considered. In the days when slides were common practice, the choice of camera and lens wasn’t as important, any 35mm SLR with a 50mm lens would do. However, now you will need to know the crop factor of your camera’s digital sensor and what focal length is considered “normal” for that sensor. The camera must also have the ability to save images as RAW files. It may be safe to say that all dSLR cameras have this ability. Working from a camera’s RAW file ensures you’ll be able to properly color correct your work.
The lights you use need to be equal in color temperature. The best lights will have a color temperature similar to that of sunlight. This enables you to produce an image faithful to the all of the nuanced colors within your work.
The next most important piece of equipment is the grey card. This simple object gives you something neutral to take a light meter reading from and to set the white balance from during post processing.
Optional Equipment:
I recommend working with a color calibrated monitor. Go to xRite.com and find a calibrator that’s right for you. I use the ColorMunki for my work. A properly calibrated monitor ensures what you see on your screen is what you can expect when printed.
The Work Space:
The work space needs to be open enough to work in and free of windows and other sources of light. If you plan to document a lot of 2D work, I recommend installing a homasote wall because you will be using a lot of nails and tacks.
Setting Up:
- Step 1: Set your camera to save RAW files and set the meter to Spot Metering.
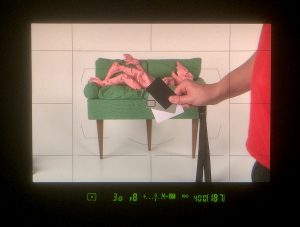
- Step2: If the size of the work permits, I recommend using clear thumb tacks to hold the work to a wall. If possible, do not pierce the work with the tacks but position the tacks beneath and beside the work so they will provide support for the work. If the work is stretched, hang the work from the lip of the stretcher using appropriate nails or screws.
Photographing 2D Art:
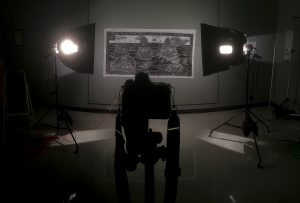
Setting up the lights is fairly simple. Position them about 45° from each other, facing the work. Once the lights are in place, take a meter reading using your grey card.
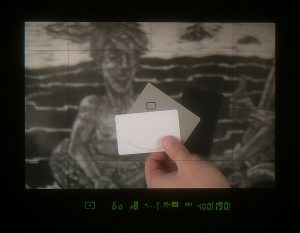
Set your exposure, I recommend using an aperture of f/8 and iso 400, your shutter speed will need to be adjusted according to the reading you get from the grey card. Once you have your exposure set, take a shot with the grey card. We’ll use this shot later to aid us during post production. Remove the grey card from the scene, position the camera on a tripod, set the focus and take the final shot.
Photographing 3D Art:
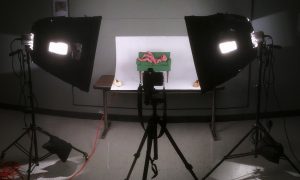
The setup for 3D art is very similar to that of 2D. The one big exception is the construction of an “infinity wall.” For smaller objects, this can easily be done with a large sheet of paper. In the image above, the paper is tacked to the wall, and held in place by a couple of old tape dispensers.
Just like the 2D setup, you’ll use the grey card to set your exposure. Once your camera is situated on the tripod, take a shot with the grey card. Remove the card, set your focus and take the final shot.
Post-Processing:
As long as you followed my advice and shot everything as a RAW file, the following portion should be a breeze. Your computer can be either a Mac or a PC, it doesn’t matter, you’ll just need access to Adobe Photoshop, which can be subscribed to as needed via Adobe’s Creative Cloud.
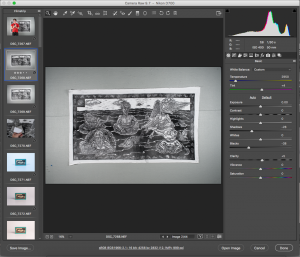
Open your RAW files into Photoshop. A new window that looks similar to this should appear. Before making any adjustments, take a moment to look at the link at the bottom of this window.
![]()
If this is your first time using the Adobe Raw Editor, it may look something like the image above. Click on the link because you’ll need to make some adjustments.
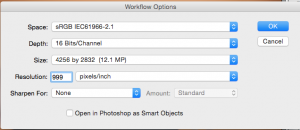
Make the following adjustments:
– Space = sRGB
– Depth = 16 bits
– Resolution = 999 pixels/inch
Do not make changes to the size, this is dictated by your camera. Click OK.
![]()
That link should now look something like this:
Using the navigator on the left, find the shot with the grey card in it and select it. Then select all either by clicking on “select all” if present, or using Control A (pc) / Command A (mac). Select the White Balance eyedropper tool from the top of the editor window, then click the eyedropper on the grey card within the main image. This will color correct all selected images by setting the white balance based on the grey card and the color temperature of your lights.
Saving:
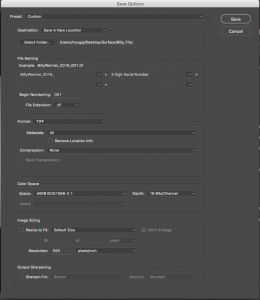
With all images selected, click Save Images from the bottom left and a window similar to this should appear. My recommendation is to save your work as a .tif to retain the highest quality for future editing. Make sure the color space is still sRGB and your pixels/inch is still set to 999. Decide where you want to save your files to, set a name (type it where it says “Document Name”), then set a 2 or 3 digit serial number by selecting that option from the drop down menu. Click Save.
 Jason Houge is a professional photographer and visual storyteller. He currently teaches Photography the University of Wisconsin–Green Bay. He has been published by NPR, New York Time LENS, Burn Magazine and others. He has exhibited with the Humble Arts Foundation and the South Street Seaport Museum in New York, NY.
Follow Jason: Instagram / Twitter / Tumblr / Facebook / LinkedIn / Blink
All artwork featured in Jason’s documentation photographs courtesy of Billy Wenner
Apply to Shifting Landscapes here: Call for Entry


Related Blog Articles
Business
Friday Fibers Roundup: Geometry (Nature + Tech)
Business
Friday Fibers Roundup: Humor and the Abject
Business
“Weaving and Knowing” by Patricia Malarcher